Tuesday, December 17, 2013

Magical Realism; The FLOAT Project


My inspiration for the photo was a picture that I found while surfing the Internet. My goal was to make it look like Emily, the model, was not jumping onto the wall, but was stuck to the wall by her feet and hands. Although it took more than a few shots to get this picture, I don't believe that there were any technical difficulties. The only artist challenge that I had to face was getting just the right angle to make it look like she was stuck to the wall. I finally resolved this issue by lying on ground and taking a picture looking up.


My inspiration and goal for this photo was to try to make it look like the subjects were floating in the air, with nothing supporting them. A technical challenge in taking this picture was Photoshopping the photo. The picture that I had taken without the subjects (and chairs that they were lying on) was much lighter that the photo with the subjects. In Photoshop, I had to blend the backgrounds of the two photos, while erasing the chairs altogether. Although I had a few technical difficulties, I didn't have any artist challenges.


My inspiration for this picture was the photo that Mr. Pedersen had shown us when the project was starting. My goal was to recreate some of the aspects of the photo (such as the flying water), while adding my own touch to it. A technical challenge was getting the water to hit the subject at the perfect time and the perfect spot. Luckily, we were able to take just a few pictures and get the right one, before getting the model too wet. A artistic challenge that I had to face was getting a new background for my photos. I didn't want all of my pictures to look like every other student's in the class, so I brought my camera down to the canyon and took my pictures there.

Friday, December 6, 2013

Creative Controls

Part 1:
  1. Which Aperture makes a wider hole in the lens for light to come through? F/3.5
  2. Which Aperture lets more light into the camera to hit the image sensor? F/5.6
  3. Which Aperture keeps more of the foreground and background in focus? F/11
  4. Which Shutter Speed is faster?  1/200 second
  5. Which Shutter Speed keeps the door in the camera open for more time? 1/30 second
  6. Which Shutter Speed is best for stopping action? 1/200 second


Part 2:

AV 4.5
AV 5.6

 AV 8
 
With the three pictures above, I adjusted just the Aperture, using Aperture Priority. The first image shows a picutre taken at F/4.5, the second at F/5.6, and the thirds at F/8. The difference between the three photos is is their depth of field. As shown above, a lower Aperture has a shallow depth of field, but when the Aperture is increased, more of the background comes in focus, as shown in the last photo.
 
TV 1/10
TV 1/60
 TV 1/500
The three photos above show the different products when the exposure time is increased and decreased and the subject is not moving. In the first picture, the exposure was open for too long, letting too much light in and resulting in a washed out picture. As the shutter speed increases, less light is let in, resutling in a darker picture.

 
TV 1/10
TV 1/60
TV 1/500
These photos demonstrate the product when the shutter speed is changed and the subject is moving. The top photo shows a shutter speed of 1/10, the middle shows 1/60, and the bottom shows 1/500. As shown above, a lower shutter speed (1/10) makes the moving object blurry. On the other hand, a high shutter speed (1/500) almost completely stops the motion of the object.
 
 
 TV 1/10
TV 1/60
 TV 1/500
The three photos above show the different results when the shutter speed is changed and the camera is panning. As shown in the first photo, when the shutter speed is low (1/10),
the whole photo is blurry and it gives the apearance that the subject is moving very fast. In the middle photo, the shutter speed is increased and only part of the photo is blurry (the boots). In the last picture, when the shutter speed is increased even more, the motion of the subject is frozen completely.
 
 
 Part 3:
 
1. Depth of field is how much of the photo is in focus and how much is blurry. With a shallow depth of field, the object in the front is in focus, while the background is blurry. With a deep depth of field, the whole photo is in focus.
 
2. If you were taking a picture of a flower and wanted the leaves in the background the be blurry, you would want to use a wide Aperture. Filling the frame would help you create this effect.
 
3. Different shutter speeds effected the lighting of my photos as well as the blur. A low shutter speed (1/10) creates a washed out blurry photo, while a high shutter speed (1/500) creates a darker photo where the motion is stopped.


Friday, November 15, 2013

Patterns


The photo above demonstrates a pattern of berries on a small bush outside of the “Q-Hut”. Although the berries are not arranged in an order that is easy to follow, the viewer can clearly tell that the berries do indeed have a pattern. In the upper left hand corner of the photo the berries are spread out, but as they get closer to the center of the photo, the berries come together. This photo was chosen as one of my best because of its bright colors. The vibrant colors of the berries and leaves give the photo a happy and joyful feeling. 


This photo was also taken to show the natural patterns of leaves. Although the photo shows a large pile of leaves, the leaves were actually barely covering the grass. I like this photo because it displays a different image than what was actually being taken. It shows that even if something doesn’t look like its photo-worthy, but the photographer gets the right angle and lighting, the product can be surprisingly good.


This photo illustrates the man-made pattern of a fence. I like this photo because the leaves were stuck in the fence, breaking the pattern. I also like the bright blue color of the sky; making the sky look as if it were fake.
 

The photo above shows the geometrical pattern of a storm drain cover in the grass. I chose this photo as one of my best because unlike some of my other photos, this photo shows an obvious pattern. I also like it because many people would not look at a storm drain and think of a cool picture, but if one opens his eyes to the world, there are so many amazing things right in the palm of his hand.  
I believe that one skill that I am doing well at is getting neat and different angles. As I looked through my pictures, I realized that many are either purposely crooked, below, or above the subject.
For our next project, my goal is to take more photos. For this last project I barely had enough photos, and next time I need to make sure I have more than I need in order to choose the best.
One way that Mr. Pedersen can help me succeed in class is teaching us more techniques on how to use Photoshop. Although we know the basics, I would like to be able to do even more.   

Thursday, November 7, 2013

Photoshop Tutorials


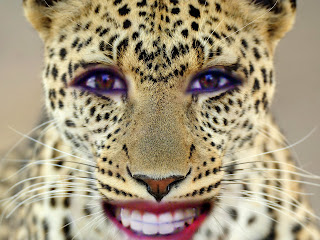
I created this image in Photoshop by laying a picture of my face over this picture of a tiger. Then I lowered the opacity and lined up my eyes and mouth to the tiger’s. Afterwards, I erased everything on my face but my eyes and mouth, and changed the opacity back to 100%. One problem that I ran into was that my eyes and mouth were and odd shade of purple, because the picture of me was taking in poor lighting. After searching around for what to do, I remembered to click auto tone, auto contrast, and auto color, and ended with what you see above. My favorite part of creating this image was erasing the rest of my face. Before I did this, the pictures looked like a disaster waiting to happen, but afterwards, I began to see what the final image was actually going to look like.

 
Similar to the picture above, I created this image using two pictures and Photoshop. I erased everything but my eyes and mouth, but the coloring was still a bit off. Like before, I clicked auto tone, auto contrast, and auto color, to correct the coloring of the image. My favorite part of making this particular picture was stretching out my face to fit the leopard’s face. Although it took a bit of extra time, it was worth it in the end.

 
I constructed this photo above by laying a photo of a red panda on top of my face. With a little bit of Photoshop magic, I was able to fit our faces together, and try and blend them together. My favorite and most difficult part of this project was trying to make it look “natural”. Although having half the face of a red panda will never look totally natural, I was able to lower the opacity of my eraser, so that some fur still showed through on both halves of my face.


This photo above was made the same way as the third photo. I laid an image of a tiger on top of my face, created a mask, and blended our faces together. The most challenging part of this project was lining up the tiger’s face with my own. The tiger has more scrunched up features, while mine are spread apart. This meant that I had to stretch the tiger’s face to fit mine, while trying to keep it looking natural. Similar to the photo before, my favorite part of creating this image was blending my face and the tiger’s face.


In this Photoshop tutorial, I learned how to take a normal picture, and transform it so it looks like a sketch. The final product is shown above. This tutorial had many steps, but they were all simple. To achieve the look above, I created many layers, changed their adjustments, changed the blend modes, applied filters, and moved around the layers. This tutorial was simple and easy to follow; therefore I didn’t run into any problems. My favorite part of creating this image was seeing the final product. Up until the last step, the photo did not look like it would turn out, but afterwards, it all came together and formed what you see above.


This photo was created the same way as the one before. The hardest part of this project was trying not to make the photo too washed out. Eventually, I adjusted the opacity of the layers, and was able to get the colors to pop more than they previously were. My favorite part of creating this particular image was inverting the image. It looked like the image was glowing from inside, which is an effect that I am not used to seeing.

The image above was created similarly to the two images before. This image was simple to Photoshop, so there was not a “hardest part” of the process. Similar the first sketch image (image 5), the best part of making the image was seeing the final product.

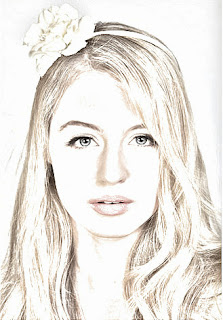
I created this image by adding a gradient map as well as an overlaying texture to the image. The hardest part of creating the image was figuring out where the gradient map was, but with some help, I was able to continue on with the project. My favorite part of creating this image was adding the texture on top of the image. That step finalized the image, and made it look even more “vintage.”


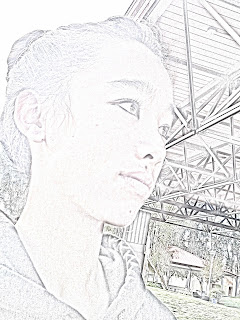
This photo was created the same way as the portrait of the blonde girl above. The hardest part of the project was trying to get the lighting correct. The original lighting of the picture was very dark, so I had to brighten the picture before starting the tutorial. Similar to the image above, the best part of creating it was adding an overlaying texture.


I completed the image above using the same steps as the two images before. The hardest part of the project was trying to find a texture that would fit the size of the image. Luckily, I changed the search options, and was able to find a texture off of Google images. The best part of creating this image was lightening the picture. After it was lightened, I was able to see the bright red of the flowers against the muted green color of the background.

Monday, October 28, 2013

Personal Composition


Rule of thirds


This picture demonstrates the rule of thirds technique. I intentionally positioned my sister, the “subject/model”, to the far left of the frame, bringing the viewer’s eyes toward her face. By positioning her and blurring out the background, the point of interest is her face, specifically her eye. This is a strong example of rule of thirds because the subject is the only thing in focus and is deliberately situated to the left side of the frame, instead of the middle. After closely examining this specific picture, I can’t find anything to improve on.  


The picture above also demonstrates rule of thirds. The subject and point of interest in this picture is the pinecone, which I stuck in a side walk crack and positioned to the right of the frame. Like the first picture, this is a strong example of the rule of thirds technique because everything but the pinecone is blurred out. Also, the viewer can easily tell that the pinecone is the main subject in the picture, even though it’s not in the middle of the frame. I believe that I can improve on the colors of my photos. When looked at together, the first and the second pictures have similar colors. Next time when I am out taking pictures, I will keep in mind this fact and try to incorporate new colors into them.
Fill the frame


The photo above shows the filling the frame technique. The main focus of the photo is the cat’s face; his nose, mouth, and eyes. Although it’s difficult to take pictures of a moving subject, especially an animal, I was able to position his face to be in the center and fill the frame. This is a strong demonstration of the filling the frame technique because to viewer’s eyes go straight to the face of the cat. Also, the cat’s eyes seem to stare right into the viewer’s eyes, catching his/her attention. One thing that could have been better with this picture is the shadows. Before I Photoshopped this picture, the shadows of the curtains casted a dark shadow on his face. Luckily, I was able to lighten the photo, ending up with the product above.
 
In this photo, the subject fills the entire frame. Because she is the only thing in the picture, she is the point of interest. I intentionally placed her in the middle of the picture and zoomed in to make sure she was the center of attention. This is why the photo above is a strong example of filling the frame. The subject is the only thing in the picture, so all attention goes to her. One thing I can improve on in this is putting the subject in better, or more direct lighting.
Using lines effectively


In this picture, I used the line of the sidewalk to lead to the person’s feet. Although the lines lead to the feet, the point of interest is the sidewalk crack. This is because I focused the camera on a certain point in the sidewalk. This is a strong example of how to use lines effectively because there is a clear and obvious line in the center of the frame, leading right to the subject’s feet. One thing that I could have done better was move the subject closer to the camera, so she is more in focus. 

 The picture above shows how the lines of the fence lead to the subject. Although the lines lead to the girl looking off into the distance, the point of interest is the fence. I intentionally placed the main subject at the end of the fence, backed away, focused, and snapped this picture. This is a strong example of using lines effectively because there is a clear line leading straight to the one and only subject. One thing that could be improved on this picture is if I cut out the sides of the frame, so it doesn't distract from the points of interest. 

Wednesday, October 23, 2013

Composition


In the photo below, the photographer uses the rule of thirds technique. The kittens’ heads are positioned to the right of the picture, while one of their bodies fills the rest of the space. The way that the photographer positioned the kittens in the picture makes it more interesting to look at. The viewer’s eyes first go to the right of the picture to look at their faces, instead of the center.


The following pictures demonstrate "rule of thirds".


The photo above uses lines to lead the viewer’s eyes to the people standing in the left hand corner. The pattered lines of the street lead away from the picture, to the city below. The lines come to an abrupt stop at the clear wall, making the viewer’s eyes stop to look around as well. Because of this, the people, who are in line with the wall, stand out.


The following pictures demonstrate the use of lines.


This portrait shows an example of the “filling the frame” technique. This technique is used to bring all the attention to the subject by filling the entire frame with that subject. In this case, the photographer brings attention to a girl and more specifically, her light blue eyes. Also, the pastel colors in the photo bring across a calm feel to the viewer.


The following pictures demonstrate the "fill the frame" technique.